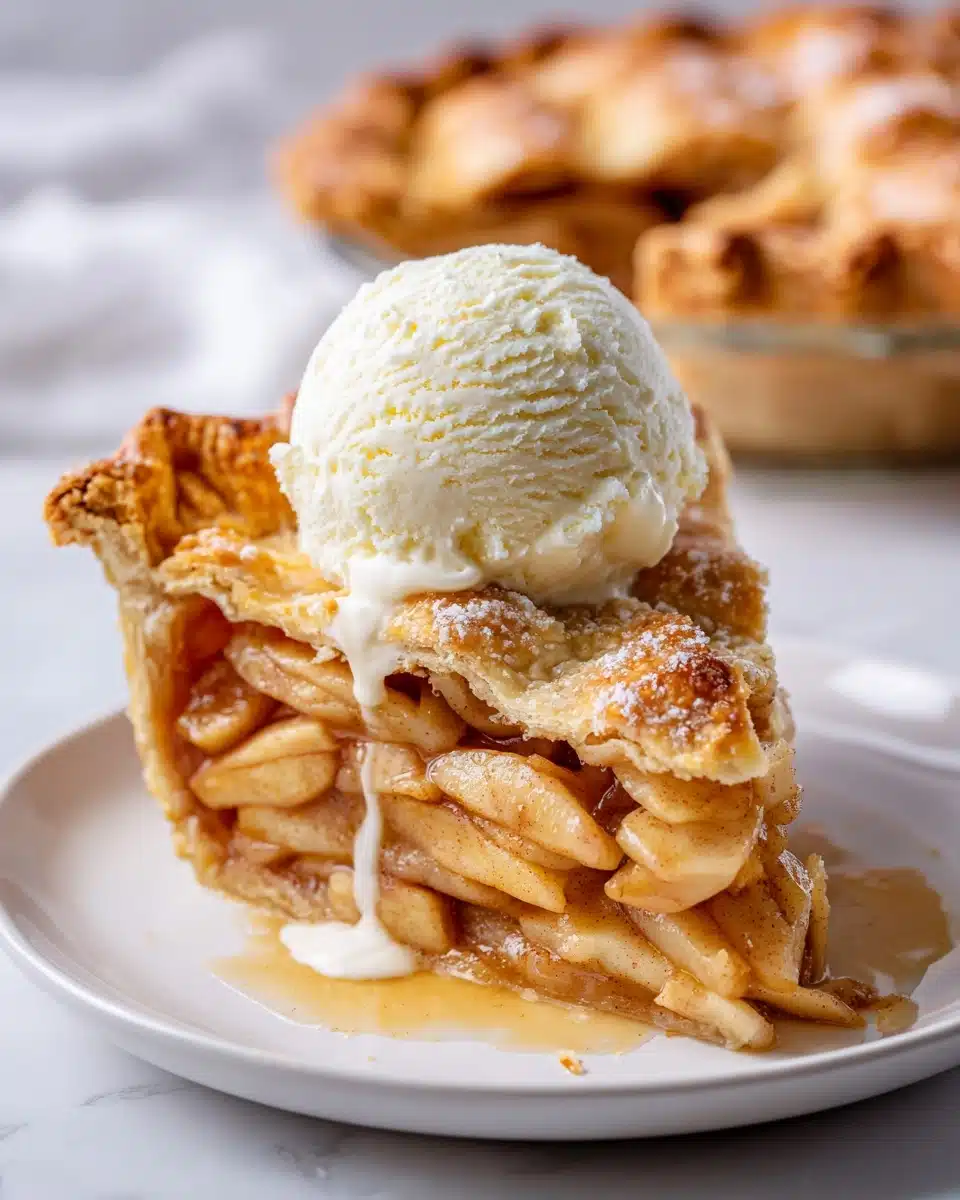
Apple Pie is a classic dessert that’s the very essence of cozy gatherings and sweet nostalgia. With its flaky, buttery crust, and warm, spiced apples melding together, it promises a slice of pure comfort no matter the season. This recipe balances tart and sweet apples with just the right blend of sugar and spices, delivering everything you crave in a traditional Apple Pie. Whether you’re sharing it at a holiday table or treating yourself on a quiet afternoon, this pie is sure to bring smiles (and likely requests for seconds!).
Ingredients You’ll Need
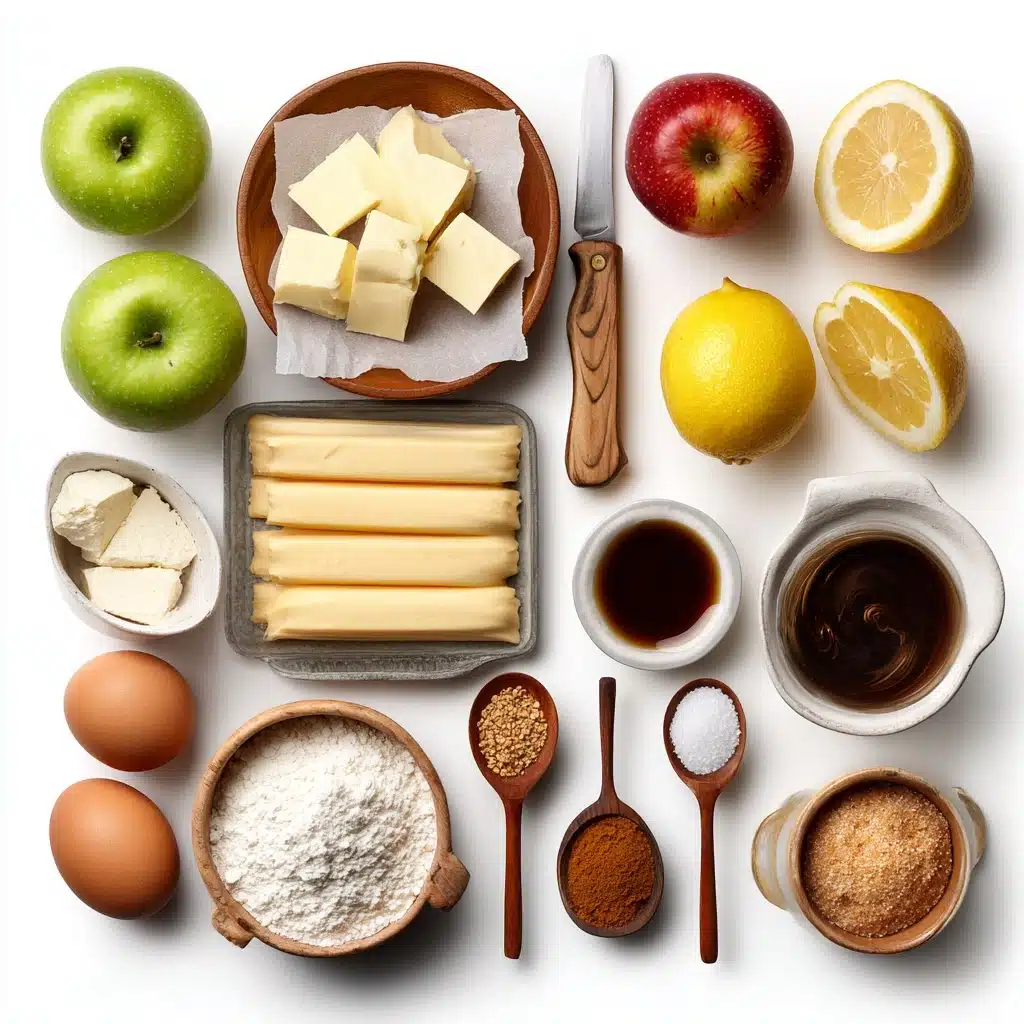
The secret to a truly exceptional Apple Pie is in its simple, honest ingredients. Each one plays a vital role—crisp apples add structure, the mix of butter and shortening creates an unbeatable flaky pastry, and just a touch of spice makes the whole pie sing. Here’s what you’ll need and why they matter.
- All-purpose flour: The foundation for your pie crust, giving it substance and structure so it holds its shape beautifully.
- Salt: Enhances all the other flavors and balances the sweetness of the filling and crust.
- Unsalted butter (cold, cubed): Creates rich flavor and those sought-after, flaky pockets in your crust.
- Vegetable shortening (cold, cubed): Ensures extra flakiness and tenderness in the pie dough—trust me, it really makes a difference!
- Ice water: Helps bring the dough together without melting the fats, crucial for a flaky crust.
- Granny Smith apples: Their tartness holds up well in baking and keeps the filling from getting too sweet.
- Honeycrisp apples: Sweet, with a crisp texture and beautiful juiciness, they balance the Granny Smiths perfectly.
- Lemon juice: Prevents browning and adds brightness to the filling, bringing out the apples’ flavor.
- Granulated sugar: Provides sweetness and helps draw out the apples’ juices.
- Light brown sugar (packed): Adds depth, warmth, and a hint of molasses to the filling.
- Ground cinnamon: Infuses the classic spiced aroma you can’t have Apple Pie without.
- Ground nutmeg: Gives a subtle, earthy warmth that perks up the flavor of the apples.
- All-purpose flour (for filling): Helps thicken the juices so you end up with luscious, not soupy, pie slices.
- Unsalted butter (for filling): Enriches the filling, giving it a silky finish and extra flavor.
- Vanilla extract: Rounds out all the flavors for the coziest aroma and taste.
- Fine sea salt: A pinch sharpens the flavors in the filling, making everything pop.
- Egg white (for brushing bottom crust): Seals the crust from sogginess once the filling goes in.
- Whole egg + water (for egg wash): Brushed on top for that irresistible golden shine as it bakes.
- Coarse sugar (for sprinkling): Adds sparkle and a bit of crunchy texture to every bite.
How to Make Apple Pie
Step 1: Make the Dough
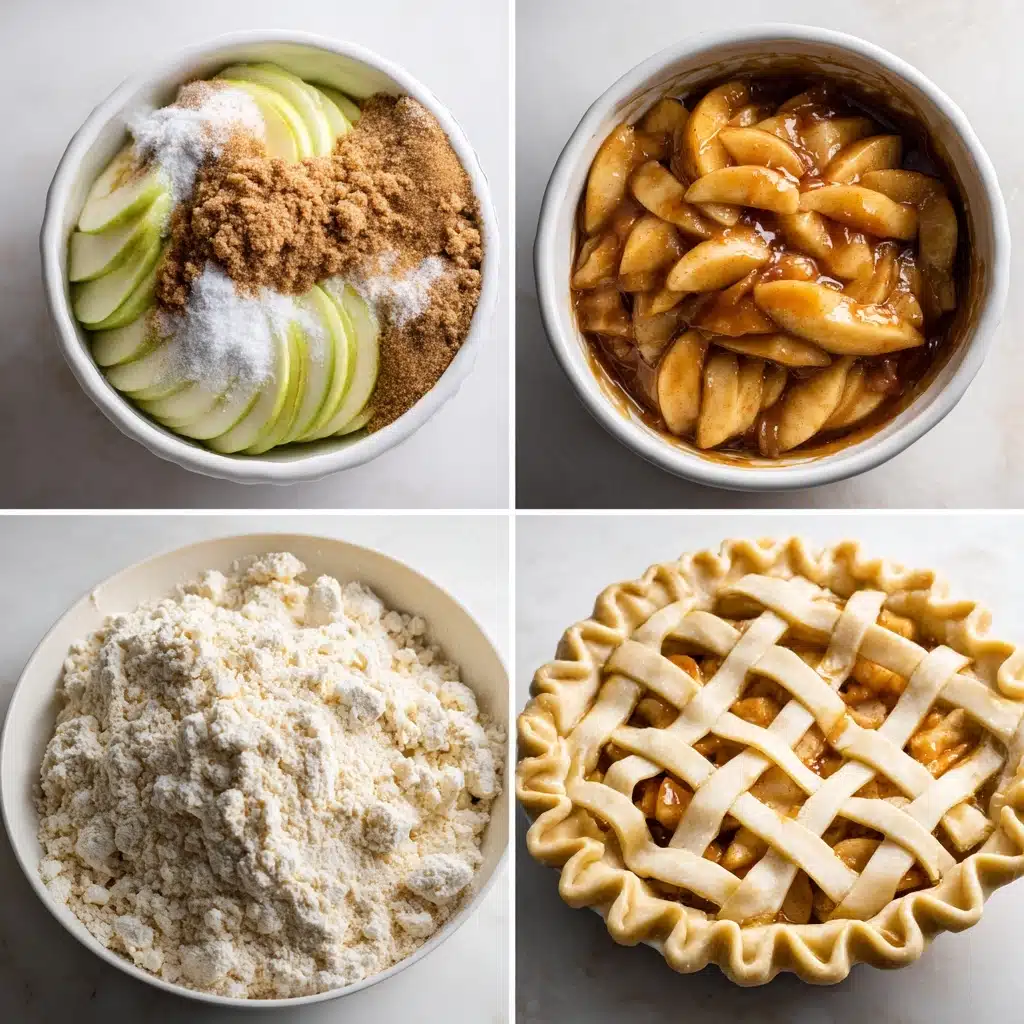
Start by whisking together the flour and salt in a large mixing bowl. This ensures even seasoning throughout the crust. Work in the cold butter and shortening using a pastry blender or your fingertips, stopping once the mixture resembles pea-sized crumbs. The pockets of fat in your dough are essential for that signature flaky Apple Pie crust.
Step 2: Add Water and Chill
Drizzle in the ice water, just a tablespoon at a time, stirring gently after each addition. The dough should come together when gently pressed—it shouldn’t be sticky. Split the dough into two even discs, wrap them tightly in plastic, and chill in the refrigerator for at least two hours. This resting time allows the gluten to relax and the fats to re-solidify, setting you up for pie perfection.
Step 3: Prepare the Apples
Now for the heart of your Apple Pie—the filling! Peel and slice the apples thinly, aiming for about 1/8-inch thickness so they’ll cook evenly. Toss the slices right away with lemon juice, sugars, cinnamon, nutmeg, flour, and a pinch of salt. Letting the apples marinate for a few minutes helps draw out their juices and meld those delicious flavors.
Step 4: Cook the Filling
Melt the butter in a large skillet over medium heat, then tip in the spiced apple mixture. Give it a gentle stir now and then, letting the apples soften and start to release their juices—this usually takes about 6 to 8 minutes. You’re just looking to tenderize, not fully cook, the apples here.
Step 5: Reduce the Juices
Scoop the softened apples into a large bowl using a slotted spoon, leaving the juices behind in the pan. Simmer those juices on their own for a few minutes until thickened and syrupy, then stir in the vanilla extract. This step concentrates every bit of apple and spice flavor, making your final Apple Pie filling richly delicious without being runny.
Step 6: Roll Out the Bottom Crust
Sprinkle your work surface with a little flour and roll one of your dough discs into a 12-inch circle. Carefully fit this into a 9-inch pie dish, allowing the dough to hang over the edges slightly. Brush the bottom and sides with a lightly beaten egg white—this helps form a moisture barrier that keeps the crust crisp beneath the juicy filling.
Step 7: Add the Filling and Top Crust
Gently spoon the cooled apple mixture into your prepared crust, letting it mound up a bit in the center for that classic rounded Apple Pie look. Roll out your second disc of dough and drape it over the top or get creative and weave a lattice. Trim any excess, then crimp the edges to seal everything in.
Step 8: Brush and Chill
For a spectacular finish, brush the top of your pie with the beaten egg and water mixture. Sprinkle generously with coarse sugar for sparkle and crunch. Pop the assembled Apple Pie in the fridge for 20 to 30 minutes—this helps hold its shape while baking and ensures a beautifully flaky crust.
Step 9: Bake and Cool
Bake your Apple Pie in a preheated 425°F oven for 15 minutes to set the crust, then reduce the temperature to 350°F and bake for another 45 to 55 minutes until golden and bubbling. If the edges seem to brown too quickly, just tent them with a bit of foil. Allow your masterpiece to cool for at least 3 hours so the filling sets and slices clean every time.
How to Serve Apple Pie
Garnishes
A little garnish goes a long way in making your Apple Pie extra special. My absolute favorites include a generous scoop of vanilla ice cream melting over a warm slice, a swirl of whipped cream, or a sprinkle of extra cinnamon. For a festive touch, try a drizzle of caramel sauce or a dusting of powdered sugar if you’re feeling fancy.
Side Dishes
While Apple Pie is undeniably the star, it pairs beautifully with a delicate cheese platter or even sharp cheddar cheese for that classic sweet-and-savory twist. For gatherings, fresh berries or a fruit salad add lovely contrast and color to your dessert table.
Creative Ways to Present
Beyond the traditional pie dish, consider cutting your Apple Pie into rustic “slab pie” bars or even baking in individual ramekins for cute, personal-sized treats. Serving with mini forks or on cake stands instantly elevates the presentation, making any occasion feel like a special event.
Make Ahead and Storage
Storing Leftovers
Leftover Apple Pie can be stored covered at room temperature for one to two days, or in the fridge for up to five days. Simply cover with foil or plastic wrap to keep it from drying out, and if you have a pie keeper, even better! The flavors meld and the apples stay deliciously tender.
Freezing
If you’re planning ahead, an unbaked assembled Apple Pie can be wrapped tightly in plastic and foil and frozen for up to three months. Bake directly from the freezer, adding a little extra time. Baked pie slices can also be frozen individually—just thaw overnight in the fridge before rewarming.
Reheating
To enjoy that just-baked taste, pop slices of Apple Pie in a preheated 325°F oven for about 10 to 15 minutes. For a quick fix, use the microwave for 30 seconds per slice, though the crust won’t be as crisp. Always let the pie cool a bit before serving to allow the filling to settle nicely.
FAQs
Which apples are best for Apple Pie?
A mix of tart Granny Smith and sweet Honeycrisp apples strikes a perfect flavor and texture balance. The Granny Smiths stand up to baking while the Honeycrisps add natural sweetness and juiciness, ensuring your Apple Pie isn’t mushy or overly sugary.
Why do I need both butter and shortening in the crust?
Butter lends rich flavor and browning, while vegetable shortening creates an ultra-flaky, tender crumb. Using both means you get the best of both worlds for your Apple Pie crust!
How do I keep the bottom crust from getting soggy?
Brushing the bottom crust with egg white works like magic, forming a protective layer. Pre-cooking the apple filling and thickening the juices also prevents excess moisture from soaking into the pie crust.
What can I do if my edges are browning too fast while baking?
Simply cover the outer rim of your Apple Pie with strips of foil or a pie shield after the first 15 minutes. This lets the center finish baking while protecting the delicate edges from over-browning.
Can I make Apple Pie without a lattice or fancy top crust?
Absolutely! A solid top crust with a few slits for venting works just as well as a lattice. If you’re feeling creative, use cookie cutters to make fun shapes or patterns for a delightful twist.
Final Thoughts
If you’ve been craving that classic, homemade comfort, this Apple Pie is the perfect project. It’s a labor of love with a delicious, showstopping reward at the end. Gather your apples, roll up your sleeves, and treat your friends and family to a slice of tradition—they’ll adore you for it!
Print
Apple Pie Recipe
- Total Time: 3 hours
- Yield: 1 9-inch pie (12 servings)
- Diet: Vegetarian
Description
Indulge in the comforting goodness of a classic Apple Pie with a flaky crust and a spiced apple filling. This recipe yields a perfect balance of sweet and tart flavors that will delight your taste buds.
Ingredients
For the Crust:
- 2 1/2 cups (310g) all-purpose flour
- 1 teaspoon salt
- 1/2 cup (113g) unsalted butter, cold and cut into small cubes
- 1/2 cup (105g) vegetable shortening, cold and cut into small pieces
- 6 to 8 tablespoons ice water
For the Filling:
- 2 pounds Granny Smith apples (about 4–5), peeled and sliced ⅛-inch thick
- 2 pounds Honeycrisp apples (about 3–4), peeled and sliced ⅛-inch thick
- juice of 1 lemon
- 1/3 cup granulated sugar
- 1/2 cup packed light brown sugar
- 1 1/2 teaspoons ground cinnamon
- 1/2 teaspoon ground nutmeg
- 2 tablespoons all-purpose flour
- 2 tablespoons unsalted butter
- 1 teaspoon vanilla extract
- pinch of fine sea salt
For Assembly:
- 1 egg white (for brushing bottom crust)
- 1 whole egg + 1 tbsp water (for top crust egg wash)
- coarse sugar for sprinkling
Instructions
- Make the dough. Whisk together the flour and salt in a large bowl. Cut in the cold butter and shortening until the mixture resembles coarse crumbs with pea-sized bits of fat.
- Add water and chill. Drizzle in ice water, 1 tablespoon at a time, mixing just until the dough holds together. Divide into two discs, wrap tightly, and refrigerate for at least 2 hours (or up to 2 days).
- Prepare the apples. Peel and thinly slice the apples, then toss them in a large bowl with lemon juice, granulated sugar, brown sugar, cinnamon, nutmeg, flour, and salt.
- Cook the filling. Melt butter in a large skillet over medium heat. Add the apple mixture and cook 6–8 minutes, stirring occasionally, until apples begin to soften and release juices.
- Reduce the juices. Transfer apples to a bowl with a slotted spoon. Simmer the remaining juices in the skillet until thickened and syrupy, about 3–5 minutes. Stir in vanilla and pour over the apples. Let cool slightly.
- Roll out the bottom crust. On a floured surface, roll one disc of dough into a 12-inch round and fit it into a 9-inch pie dish. Brush the bottom and sides with egg white to help seal.
- Add the filling and top crust. Spoon the cooled apple mixture into the crust, mounding slightly. Roll out the second disc and place over the filling (or weave into a lattice). Trim and crimp edges.
- Brush and chill. Brush the top with egg wash (1 egg + 1 tablespoon water) and sprinkle with coarse sugar. Chill the assembled pie in the fridge for 20–30 minutes before baking.
- Bake and cool. Bake at 425°F for 15 minutes, then reduce to 350°F and bake 45–55 minutes longer, until golden and bubbling. Tent with foil if the crust browns too quickly. Cool for at least 3 hours before slicing and serving.
Notes
- For a decorative finish, consider using cookie cutters to create shapes with the leftover dough for the top crust.
- Serve warm with a scoop of vanilla ice cream for a classic pairing.
- Prep Time: 30 minutes
- Cook Time: 1 hour
- Category: Dessert
- Method: Baking
- Cuisine: American
Nutrition
- Serving Size: 1 slice
- Calories: 320
- Sugar: 22g
- Sodium: 180mg
- Fat: 15g
- Saturated Fat: 8g
- Unsaturated Fat: 6g
- Trans Fat: 0g
- Carbohydrates: 45g
- Fiber: 3g
- Protein: 2g
- Cholesterol: 30mg

