Sushi Cups are an absolute game-changer for anyone who loves sushi but wants all the fun in an easy, bite-sized package! Think of all the vibrant flavors and satisfying textures of your favorite sushi roll, stacked into delightful, hand-held portions that are perfect for parties, lunches, or just treating yourself at home. With their customizable veggie fillings and irresistible, creamy spicy mayo, Sushi Cups deliver everything you love about a sushi night, minus the fuss of rolling. They’re fresh, colorful, and endlessly adaptable—get ready to fall in love!

Ingredients You’ll Need
You’ll be amazed at how just a handful of accessible, simple ingredients combine to build these Sushi Cups. Each element brings a pop of flavor, texture, or color, ensuring every bite is satisfying and stunning on a platter.
- Sushi rice: Sticky, plump, and just the right texture for shaping these foundation cups.
- Water: The essential companion for cooking your sushi rice to fluffy perfection.
- Finely chopped veggies (carrots, cucumber, bell peppers, sprouts): Fresh, crunchy, and bursting with color—choose your favorites!
- Steamed mukimame (shelled edamame): Adds a hearty, protein-rich bite and lovely green hue.
- Diced avocado: Creamy richness that takes each Sushi Cup to the next level.
- Soy sauce, tamari, or coconut aminos: Just a splash brings umami depth to the veggie mix.
- Mayonnaise: The base for our dreamy spicy mayo drizzle.
- Sriracha sauce: Adds that signature gentle heat—spice to taste.
- Coconut aminos or soy sauce (for spicy mayo): A savory boost for the creamy sauce.
- Honey: A tiny touch of sweetness to balance the spicy mayo.
- Sesame oil: Nutty, aromatic, and unmistakable in flavor.
- Black sesame seeds: The perfect visual and crunchy finish!
How to Make Sushi Cups
Step 1: Cook the Sushi Rice
Start by thoroughly rinsing one cup of sushi rice under cold water—this removes excess starch and prevents stickiness overload. In a medium pot, combine your rinsed rice with 1 1/2 cups water, bring it to a rolling boil, then cover and let simmer on low for about 20 minutes. Once the water is fully absorbed and the grains are tender, remove the pot from the heat. Let the rice chill out for a few minutes; you want it cool enough to handle when shaping your Sushi Cups later.
Step 2: Shape and Chill the Rice Cups
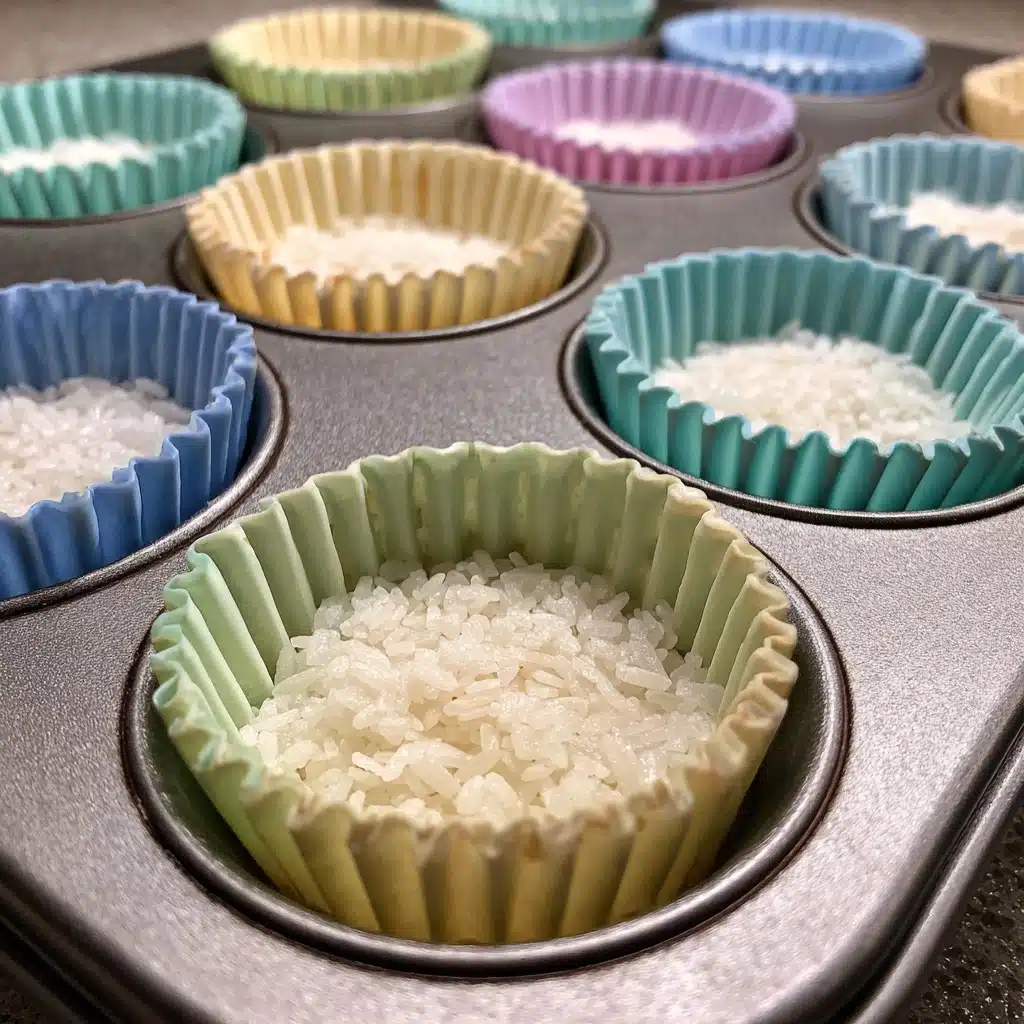
Grab a muffin tin or, if you have them, silicone baking cups for easy removal. Scoop about 2 heaping tablespoons of the cooked rice into each cup and press down firmly—you’re aiming for a compact little nest that will hold up under all those toppings. Once your rice bases are shaped, pop the tin in the fridge for 20 minutes. This step is your secret weapon for sturdy, hand-held Sushi Cups that never fall apart.
Step 3: Make the Veggie Filling
While the rice is chilling, it’s the perfect time to assemble your colorful, crunchy filling. In a mixing bowl, combine your choice of finely chopped veggies, steamed edamame, diced avocado, and a tablespoon of soy sauce (or tamari/coconut aminos). Toss it all together so every bite bursts with fresh flavor and bright color—Sushi Cups really shine with a rainbow mix!
Step 4: Whip Up Spicy Mayo
In a separate small bowl, whisk up the spicy mayo: blend mayonnaise, sriracha, soy sauce (or coconut aminos), honey, and sesame oil until silky smooth. Adjust the sriracha to your personal heat preference; a little goes a long way! This creamy, zippy sauce instantly elevates your Sushi Cups and ties all those fantastic flavors together.
Step 5: Assemble and Finish Your Sushi Cups
Take the chilled rice cups from the fridge and gently loosen them if needed. Top each “cup” with a generous spoonful of the veggie filling. Next, drizzle that irresistible spicy mayo over the top, and finish with a sprinkle of black sesame seeds for crunch and a hint of dramatic flair. Admire your tray of Sushi Cups—they look restaurant-worthy and taste even better!
How to Serve Sushi Cups
Garnishes
A little flair goes a long way! Scatter extra black sesame seeds, thinly sliced green onions, or even a few microgreens on top of your Sushi Cups for added color and texture. If you want to get fancy, add a dollop of wasabi or a sliver of pickled ginger for that true sushi bar touch.
Side Dishes
Sushi Cups are pretty versatile and play well with an array of sides. Consider serving them alongside miso soup, a simple seaweed salad, or crispy roasted seaweed sheets for extra crunch. A refreshing cucumber salad adds a cooling element that balances the richness of the spicy mayo.
Creative Ways to Present
Presentation is half the magic! Arrange your Sushi Cups on a long platter, alternating different veggie fillings for a burst of color. Or serve each in individual silicone baking cups for easy grab-and-go snacking. You could even include little dipping bowls of extra soy sauce or spicy mayo, letting guests dress up their Sushi Cups to their liking.
Make Ahead and Storage
Storing Leftovers
If you happen to have any Sushi Cups left (though that’s rare!), store them in a single layer in an airtight container in the refrigerator. They’ll stay fresh for up to two days. For best results, keep extra sauce separate and drizzle fresh when serving to avoid sogginess.
Freezing
Freezing Sushi Cups isn’t ideal, since the rice and fresh veggies can lose their vibrant texture when thawed. For the best experience, enjoy these little gems fresh—or, if you must, freeze the rice “cups” alone, then defrost and top with fresh veggies just before serving.
Reheating
Sushi Cups are designed to be eaten cold or at room temperature, so there’s no need to reheat them. If your rice cups happen to get too cold in the fridge, simply let them sit out for a few minutes before serving. Warm sushi rice isn’t traditional for this appetizer, so patience pays off in keeping everything cool and delicious.
FAQs
Can I use regular rice instead of sushi rice?
While possible, regular rice won’t have the same sticky texture as sushi rice, which is essential for holding the shape of your Sushi Cups. If you must substitute, try short-grain rice, but expect some differences in how well the cups hold together.
What veggies work best in Sushi Cups?
The beauty of these cups is customization—think crunchy raw options like carrots, bell peppers, cucumber, radish, or sprouts. Feel free to play with color and texture for the most eye-catching and tasty result.
How do I make these vegan?
Easily! Swap the mayo for a vegan mayonnaise, use maple syrup instead of honey in the spicy sauce, and double-check that your chosen sauce (like soy or tamari) is vegan. The rest of the ingredients are naturally plant-based and perfect for a vegan twist.
Can kids help assemble Sushi Cups?
Absolutely! This is actually a great hands-on recipe for little ones. Kids can press the rice into the muffin cups, pile on their favorite toppings, and even drizzle the sauce. It’s simple, safe, and a fun way to introduce new veggies.
Are Sushi Cups gluten free?
They can be! Use tamari or coconut aminos instead of soy sauce (which often contains wheat), and double-check the ingredients in your sriracha and mayo. With these tweaks, Sushi Cups make an excellent gluten-free snack or party appetizer.
Final Thoughts
If you’ve never tried Sushi Cups before, now’s your chance to wow yourself and anyone lucky enough to share in these adorable bites. Play with your favorite flavors, grab those veggies, and have fun creating your own mini sushi masterpieces—you’ll be amazed at how quickly they disappear!
Print
Sushi Cups Recipe
- Total Time: 40 minutes
- Yield: 12 sushi cups
- Diet: Vegetarian
Description
Sushi cups are a delightful twist on traditional sushi, offering a convenient and portable way to enjoy the flavors of sushi in a bite-sized form. These sushi cups are customizable with a variety of fresh veggies and a spicy mayo topping, making them a perfect appetizer or snack for any occasion.
Ingredients
Sushi Ingredients:
- 1 cup sushi rice, rinsed
- 1 1/2 cups water
- 1/2 cup finely chopped veggies of your choice (carrots, cucumber, bell peppers, sprouts)
- 1/4 cup steamed mukimame (shelled edamame)
- 1/4 cup diced avocado (~1/2 small avocado)
- 1 tablespoon soy sauce, tamari, or coconut aminos
Spicy Mayo Ingredients:
- 1/4 cup mayonnaise
- 1 teaspoon Sriracha sauce (adjust to taste)
- 1 teaspoon coconut aminos or soy sauce
- 1 teaspoon honey
- 1/2 teaspoon sesame oil
- Black sesame seeds (for garnish)
Instructions
- Cook the Rice: Rinse rice and cook with water until done. Cool slightly.
- Form Rice Cups: Press cooked rice into muffin tin cups and chill.
- Prepare Veggie Filling: Mix veggies, edamame, avocado, and soy sauce.
- Make Spicy Mayo: Whisk mayo, Sriracha, soy sauce, honey, and sesame oil.
- Assemble: Fill rice cups with veggie mix, drizzle with spicy mayo, and garnish with sesame seeds.
Notes
- Prep Note: While the rice chills, prepare the veggie filling and spicy mayo.
- Prep Time: 20 minutes
- Cook Time: 20 minutes
- Category: Appetizer
- Method: Mixing, Chilling
- Cuisine: Japanese
Nutrition
- Serving Size: 1 sushi cup
- Calories: 110 kcal
- Sugar: 2g
- Sodium: 80mg
- Fat: 5g
- Saturated Fat: 1g
- Unsaturated Fat: 4g
- Trans Fat: 0g
- Carbohydrates: 16g
- Fiber: 1g
- Protein: 2g
- Cholesterol: 5mg


